Getting Started
This page takes you from installation to your first complete AortaCFD run. If you want the shortest route, follow the Quick Start section first. Return to the installation and output sections only if you need to customise the environment or inspect workflow details.
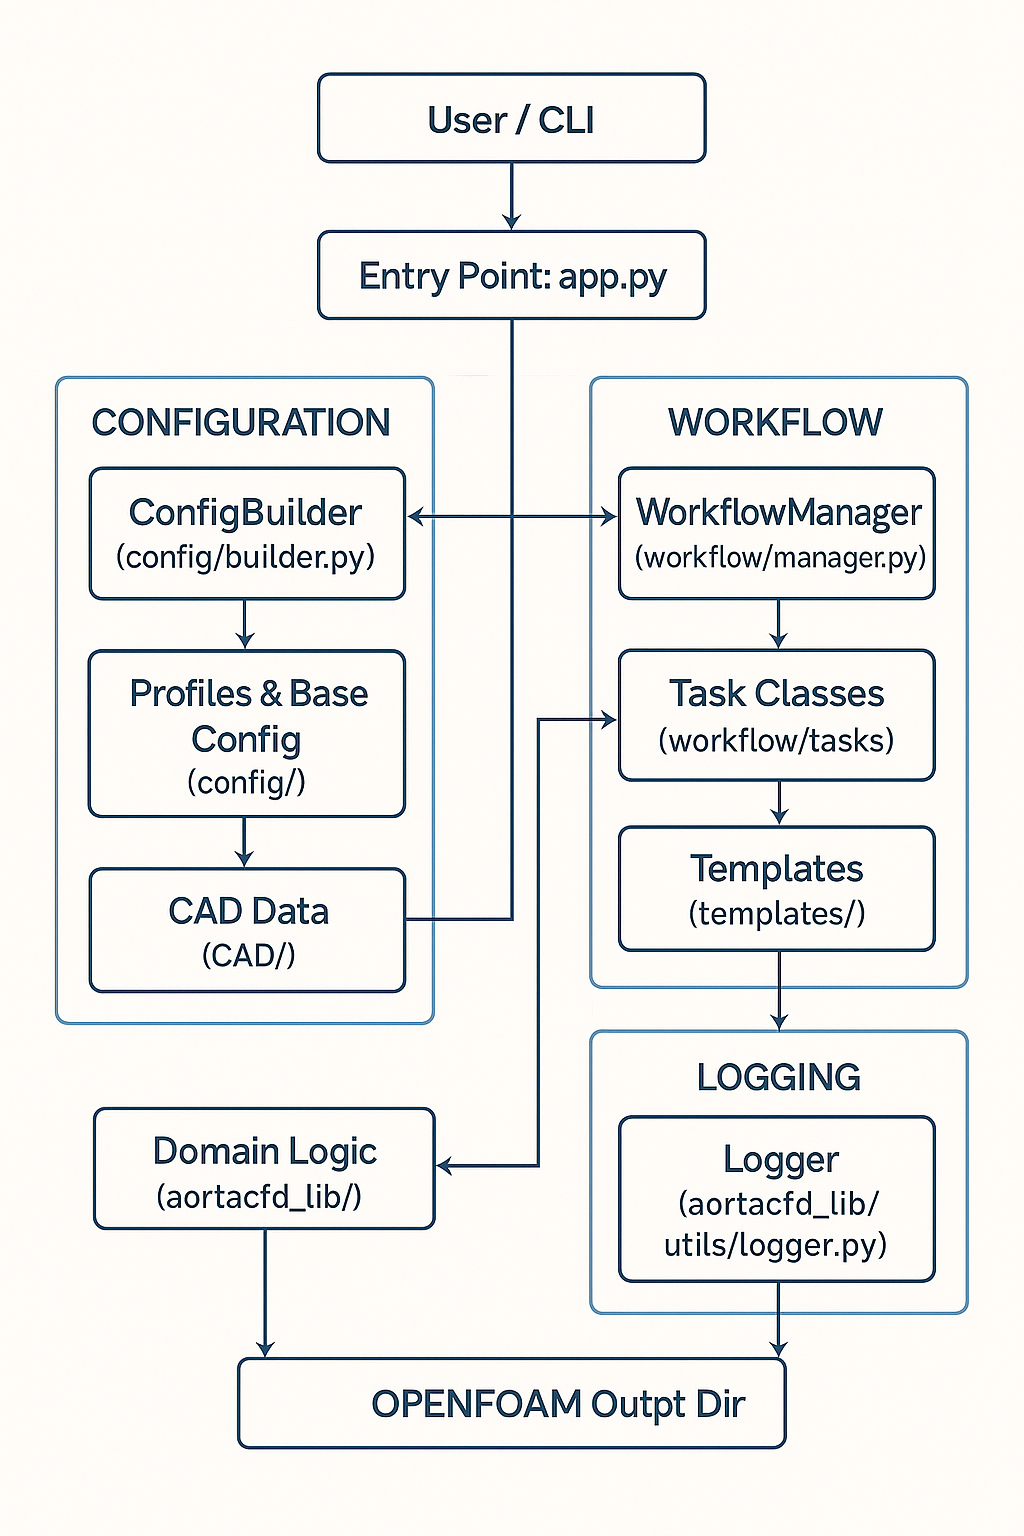 AortaCFD workflow: from patient-specific STL geometry through mesh generation, solver setup, and hemodynamic analysis.
Fastest First Run
If OpenFOAM 12 and Python 3.12 are already installed:
git clone https://github.com/JieWangnk/AortaCFD-app.git && cd AortaCFD-app
python3 -m venv venv && source venv/bin/activate && pip install -r requirements.txt
source /opt/openfoam12/etc/bashrc
python run_patient.py BPM120 --quick --run-name first_test
What success looks like: the workflow completes without fatal errors, and the directory output/BPM120/first_test/ contains results/qoi_summary.json with hemodynamic metrics.
Requirements
AortaCFD requires the following software environment:
| Component | Version | Notes |
|---|---|---|
| Operating System | Linux (Ubuntu 20.04+) | WSL2 on Windows is supported |
| Python | 3.12 | Virtual environment recommended |
| OpenFOAM | 12 (Foundation) | Must be the openfoam.org release, not ESI/OpenCFD |
| ParaView | 5.x (optional) | For visualisation of results |
OpenFOAM Version
AortaCFD is developed and tested exclusively with OpenFOAM 12 from the OpenFOAM Foundation. The ESI/OpenCFD version (openfoam.com) uses different solver syntax and is not compatible.
Installation
1. Clone the repository
2. Create a Python virtual environment
python3 -m venv venv
source venv/bin/activate
pip install --upgrade pip
pip install -r requirements.txt
3. Source OpenFOAM
OpenFOAM 12 must be sourced before running any workflow step:
4. Install the Windkessel boundary condition (optional)
For simulations using 3-element Windkessel outlet boundary conditions, compile and install the custom OpenFOAM library:
This compiles libmodularWKPressure.so and the associated backflow stabilisation velocity boundary condition.
Verification
After installation, confirm that OpenFOAM and Python are correctly configured:
Case Layout
Each patient case resides in a subdirectory of cases_input/. The minimum required files are a configuration JSON and the STL surface patches defining the vessel geometry:
cases_input/<case_id>/
├── config.json             Main configuration file
├── inlet.stl               Inlet boundary patch
├── outlet1.stl             Outlet boundary patch(es)
├── outlet2.stl
├── ...
├── wall_aorta.stl          Vessel wall patch
└── flowrate.csv            (optional) Pulsatile inlet waveform
STL File Requirements
- STL files should be in millimetres. The workflow scales them to metres using the
scale_factorparameter inconfig.json(typically0.001). - Patch names in the STL filenames must match the
geometrykeywords in the configuration (e.g.,inlet,outlet1,wall_aorta). - Binary or ASCII STL format is accepted.
Quick Start
List available cases
Run a complete simulation
This executes all eight workflow steps in order: case setup, mesh generation, boundary condition assignment, numerics regeneration, solver execution, reconstruction, post-processing, and visualisation.
Common options
# Custom output folder name
python run_patient.py BPM120 --run-name baseline_standard

# Use a different configuration file
python run_patient.py BPM120 --config config_mesh_fine.json

# Run only selected steps
python run_patient.py BPM120 --steps case,mesh,boundary

# Fast test mode (coarse mesh, first-order numerics)
python run_patient.py BPM120 --quick

# Override numerics profile
python run_patient.py BPM120 --profile robust
For complete CLI documentation, see CLI Reference.
Workflow Steps
AortaCFD decomposes the simulation into eight discrete steps. Each step can be executed individually or combined via the --steps flag.
| Step | Description |
|---|---|
case |
Create OpenFOAM case structure, scale STL geometry, write dictionaries |
mesh |
Execute blockMesh, surfaceFeatures, snappyHexMesh, and checkMesh |
boundary |
Generate inlet flow data, configure outlet BCs, write initial fields (0/) |
regenerate-numerics |
Adapt fvSchemes/fvSolution based on mesh quality metrics |
solver |
Run foamRun with optional parallel domain decomposition |
reconstruct |
Reconstruct parallel case from processor directories |
postprocess |
Compute TAWSS, OSI, RRT, pressure drop; export QoIs |
paraview |
Generate ParaView visualisation |
Output Structure
Each simulation run produces a self-contained output directory:
output/<case_id>/<run_name>/
├── openfoam/                    OpenFOAM case directory
│   ├── 0/                       Initial and boundary conditions
│   ├── constant/                Mesh (polyMesh), transport properties
│   ├── system/                  Solver dictionaries
│   └── logs/                    Execution logs (blockMesh, snappyHexMesh, solver)
├── reports/
│   ├── merged_config.json       Full runtime configuration (for reproducibility)
│   ├── simulation_setup_report.txt
│   └── inlet_audit.json         Inlet boundary condition audit trail
├── results/
│   ├── qoi_summary.json         Hemodynamic quantities of interest
│   └── qoi_summary.csv          QoIs in flat CSV format
└── summary.json                 Run metadata
The merged_config.json file captures the complete resolved configuration (base defaults + profile + user overrides), enabling full reproducibility of any simulation run.
Testing
AortaCFD includes over 2000 automated tests covering configuration, boundary conditions, meshing, hemodynamics, and workflow integration:
# Run full test suite
./venv/bin/pytest tests/ -v

# With coverage report
./venv/bin/pytest tests/ --cov=src --cov-report=html
Version Compatibility
This documentation describes AortaCFD v2.1.0 with OpenFOAM 12 (Foundation version). Configuration syntax and workflow steps may differ in other versions. The merged_config.json output file records the exact version and configuration used for each simulation.
Found an issue or have a suggestion for this page?
Open a GitHub issue