snappyHexMesh Boundary Layer Toolkit
Why boundary layers matter
In cardiovascular computational fluid dynamics, the wall shear stress field is the single most clinically meaningful quantity the simulation produces. Time-averaged wall shear stress (TAWSS) and the oscillatory shear index (OSI) drive endothelial response, atherosclerosis localisation, and aneurysm growth predictions. Both quantities are computed from the velocity gradient at the vessel wall, so the accuracy of the wall-adjacent mesh directly determines whether a simulation result is trustworthy or misleading.
A standard tetrahedral or hex-dominant mesh refined only at the wall surface is not enough. To resolve the steep velocity gradient inside the viscous sublayer, the mesh must transition smoothly from large interior cells to thin, anisotropic prismatic layers hugging the wall. snappyHexMesh, the OpenFOAM mesher, supports this through its addLayers step, but generating reliable layers in patient-specific geometry is notoriously sensitive: parameters interact, the inner curvature of the aortic arch is hostile to layer growth, and the typical user has to tune a dozen knobs before the result is acceptable.
This toolkit removes that friction.
Application Overview
The snappyHexMesh Boundary Layer Toolkit is a Python-based automation tool that simplifies boundary layer meshing in OpenFOAM. Through systematic parameter studies and automatic detection, it reduces the required user inputs from 10+ parameters to just 2 essential ones. The toolkit was developed alongside the AortaCFD pipeline and validated on real patient-specific aortic geometries, so the parameter ranges reflect what actually works for cardiovascular meshes rather than synthetic benchmarks.
Status: Available - Complete toolkit with validated results
Key Features: - 90% parameter reduction through automation - Auto-detection of wall patches, interior points, and mesh parameters - Validated performance: 87-95% thickness fraction consistently - Quick iteration capability for parameter optimization
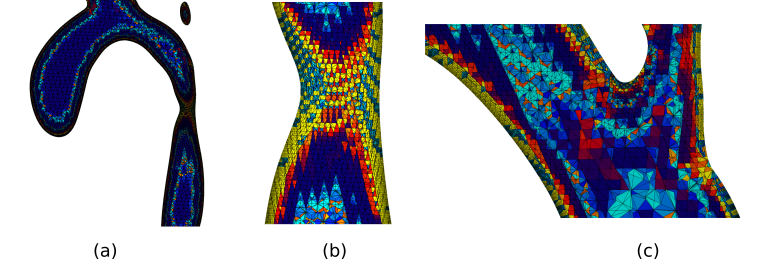 Boundary layer mesh with 10 layers, showing consistent layer thickness distribution.
 Comparison of different layer configurations and their effect on mesh quality.
Quick Start
The toolkit operates entirely from the command line. Place your STL files in the standard OpenFOAM constant/triSurface/ directory, run a single Python script with two parameters, and it produces a complete snappyHexMeshDict with validated layer settings. The two parameters are the relative target thickness (T-rel) and the number of prismatic layers (n-layers); everything else is detected from the geometry.
Basic Usage
# Place your STL files in constant/triSurface/
#   - wall_aorta.stl (or wall.stl)
#   - inlet.stl
#   - outlet1.stl, outlet2.stl, etc.

# Run with just 2 parameters!
python auto_layers.py --T-rel 0.35 --n-layers 5
Everything else is auto-detected:
- Wall and inlet patch names
- Interior point via ray-casting
- Base cell size from blockMeshDict
- Outlet patches automatically
Validated Parameter Ranges
Based on systematic testing with complex vascular geometry, where T_rel = T_total/Δx_surf (total boundary layer thickness relative to surface cell size):
| Layers | Best T_rel | Expected Thickness Fraction |
|---|---|---|
| 2-3 | 0.30-0.40 | 90-95% |
| 4-5 | 0.30-0.35 | 87-90% |
| 8-10 | 0.20-0.25 | 78-84% |
Installation & Setup
Prerequisites
Installation Options
Option 1: Lightweight Toolkit (144KB)
Perfect if you have your own STL files:
git clone https://github.com/JieWangnk/snappy-layer-toolkit.git
cd snappy-layer-toolkit
python auto_layers.py --T-rel 0.35 --n-layers 5
Option 2: Complete Package with Test Case (7.3MB)
Includes everything + working example for immediate testing:
Download: snappy-layer-toolkit-v1.0-20250901.tar.gz
# Extract and test immediately
tar -xzf snappy-layer-toolkit-v1.0-20250901.tar.gz
cd snappy-layer-toolkit-v1.0-20250901

# 30-second demo with included geometry
./quick_start.sh
Advanced Usage
# Parameter optimization
python auto_layers.py --sweep --T-rel-range 0.2 0.5 0.05 --n-layers 5

# Quick iteration (reuse surface mesh)
python auto_layers.py --T-rel 0.30 --n-layers 5 --quick

# Manual base cell size (when blockMeshDict absent)
python auto_layers.py --T-rel 0.35 --n-layers 5 --dx-base 0.001
How It Works
1. Auto-Detection System
Patch Identification: Automatically scans constant/triSurface/ for STL files with common naming patterns (wall.stl, inlet.stl, etc.) and maps these to OpenFOAM patch names. Falls back to constant/geometry/ if triSurface/ doesn't exist.
Interior Point Calculation: Uses ray-casting with the Möller-Trumbore algorithm to find valid interior points automatically. The method:
- Samples candidate points within geometry bounding box
- Casts rays in multiple directions
- Counts surface intersections (odd = inside geometry)
- Uses majority voting for robustness
- Sanity check: Ensures distance to nearest wall > 3·Δx (prevents boundary interference)
- Quality assurance: Validates interior point is sufficiently far from surfaces
Mesh Parameter Detection: Extracts base cell size from blockMeshDict when available, ensuring consistency between background and layer meshes. When blockMeshDict is absent, specify base cell size with --dx-base parameter.
2. Empirical Parameter Relationships
Through systematic testing on the 0010_H_AO_H aorta model (166,708 surface triangles), the toolkit establishes validated relationships between:
- Layer count and optimal thickness parameters
- Surface refinement impact on thickness fraction
- Expansion ratio stability limits
3. Geometric Validation
Feature Size Check: Before mesh generation, validates that minimum feature size exceeds first-layer height:
- Analyzes surface geometry for narrow passages and sharp features
- Compares against calculated first-layer thickness (T_total/layers × expansion_factor)
- Aborts with clear error if features too small: prevents impossible layer growth
- Suggests parameter adjustments (fewer layers or higher T_rel) when validation fails
4. Effective Layer Calculation
Calculates actual layers achieved using geometric series relationship:
Where:
- ER = expansion ratio
- N = target layers
- f = thickness fraction achieved
Usage Examples
For New Users (Conservative)
For Production (Balanced)
For Research (High Resolution)
Validation Results
The validation strategy combines geometric verification (does the mesh actually have the layers it claims?) with quantitative performance reporting (what fraction of the requested boundary layer thickness was achieved?). Both metrics matter: snappyHexMesh frequently reports success while silently producing degenerate cells in high-curvature regions, so reading the log alone is not enough. The toolkit re-extracts the achieved thickness from the mesh itself and compares it to the requested target.
Layer Growth Progression
The following table summarises layer growth results across four configurations tested on a complex aortic geometry (166,708 surface triangles). Higher layer counts require lower T_rel values, and increased surface refinement improves thickness fraction:
| Configuration | Layers | Refinement Levels | T_rel | Thickness Fraction |
|---|---|---|---|---|
| Conservative | 2 | 1-3 | 0.40 | 95% |
| Balanced | 6 | 1-3 | 0.30 | 88% |
| High-resolution (A) | 10 | 1-3 | 0.22 | 72% |
| High-resolution (B) | 10 | 2-3 | 0.22 | 84% |
Configuration (B) demonstrates that increasing the minimum surface refinement level from 1 to 2 improves thickness fraction by 12 percentage points for the same layer count.
High-Curvature Challenges
In high-curvature regions of the aortic arch, layer growth faces fundamental geometric limitations. Despite optimised parameters (T_rel=0.22, levels 2-3), boundary layer growth fails in areas of tight curvature and complex geometry transitions. This is a geometric constraint rather than a parameter deficiency: the concave inner wall of the arch provides insufficient space for multiple prismatic layers to grow without collision Jasak 1996.
Performance Summary
Recent validation runs confirm consistent results:
- 3 layers, T_rel = 0.35: 95.3% thickness fraction, 2.88 effective layers
- 5 layers, T_rel = 0.35: 87.3% thickness fraction, 4.37 effective layers
- 10 layers, T_rel = 0.20: 78.2% thickness fraction, 7.82 effective layers
Key Findings
Parameter Scaling Relationships
Thickness Scaling: T_rel values decrease from 0.40 for 2 layers to 0.22 for 10 layers, confirming that higher layer counts require proportionally lower thickness demands.
Surface Refinement Impact: Increasing surface refinement levels from 1-3 to 2-3 can improve thickness fraction by up to 17%.
Quality Preservation: All configurations maintain mesh quality criteria, showing that good boundary layers can be achieved without relaxing geometric constraints.
Fundamental Limitations
Curvature Constraints: No parameter optimization can fully overcome layer growth failure in regions of high curvature and complex geometry transitions.
Thickness Fraction Ceiling: The 78-84% thickness fraction limit for 8-10 layers reflects physical limitations rather than parameter deficiencies.
Geometric Reality: Curvature-induced layer pruning cannot be eliminated by parameter adjustment alone.
Troubleshooting
Auto-detection Issues
# Override with your patch names
python auto_layers.py --T-rel 0.35 --n-layers 5 \
    --wall-name my_wall --inlet-name my_inlet

# Custom geometry location
python auto_layers.py --T-rel 0.35 --n-layers 5 \
    --geometry-dir constant/surfaces

# Missing blockMeshDict
python auto_layers.py --T-rel 0.35 --n-layers 5 \
    --dx-base 0.0005  # Specify base cell size manually
Poor Thickness Fraction
- Try lower T_rel (reduce by 20-30%)
- Use fewer layers with higher T_rel
- Increase surface refinement levels
Geometry Setup
your-case/
├── constant/triSurface/     # Primary location (OpenFOAM standard)
│   ├── wall.stl        # Main wall (auto-detected)
│   ├── inlet.stl       # Inlet boundary
│   ├── outlet1.stl     # Outlets (auto-discovered)
│   └── outlet2.stl
├── system/
│   └── blockMeshDict   # Background mesh (optional)
└── # Run toolkit here

# Alternative: constant/geometry/ also supported for compatibility
Toolkit Components
auto_layers.py- Main automation scriptscripts/generate_dicts.py- Dictionary generator with auto-detectionscripts/find_interior_point.py- Ray-casting point finderscripts/metrics_logger.py- Thickness fraction analyzersystem/- OpenFOAM template files
Limitations & Considerations
Current Limitations
- File Naming Dependency: Requires standard STL naming conventions for auto-detection
- Geometry Location: Searches
constant/triSurface/first, thenconstant/geometry/as fallback - Base Cell Size: Requires either
blockMeshDictor manual--dx-basespecification - Geometry Focus: Optimized for pipe-like internal flows (vascular, industrial)
- OpenFOAM Version: Tested with OpenFOAM 12
- Complex Topologies: External flows or unusual geometries may need different approaches
Physical Constraints
- High Curvature Regions: Will always present challenges for excessive layer counts
- Layer Count Limits: Diminishing returns above 10 layers due to geometric constraints
- Surface Quality Dependency: Input STL quality affects final mesh quality
Integration Notes
This toolkit complements cardiovascular CFD workflows by: - Providing reliable boundary layer generation for vessel geometries - Reducing the expertise barrier for mesh generation - Enabling systematic parameter studies and optimization - Supporting both research and production applications
Resources & Documentation
- GitHub Repository - Complete source code and examples
- Validation Geometry - Vascular Model Repository data used for testing
- OpenFOAM Integration - Compatible with standard OpenFOAM workflows
Citation
If you use this toolkit in your research, please cite:
@software{snappy_layer_toolkit_2025,
  title={snappyHexMesh Boundary Layer Toolkit},
  author={Jie Wang},
  year={2025},
  url={https://github.com/JieWangnk/snappy-layer-toolkit}
}
Transform your boundary layer meshing from hours to minutes through systematic automation and validated parameter relationships.
Reference: Jasak 1996 — FVM error analysis (PhD thesis, Imperial College).
Found an issue or have a suggestion for this page?
Open a GitHub issue